
Changing the thermostat in your car may sound like a complicated task, but with a little know-how and the right tools, it’s a repair that almost anyone can tackle. In this comprehensive guide, we’ll break down how to change your car’s thermostat, when to know it’s time for a replacement, and provide you with useful tips to ensure you get the job done safely and effectively. Let’s dive into the process of replacing your car’s thermostat!
What Is a Thermostat in a Car?
The thermostat in your car controls the engine’s temperature by regulating the flow of coolant. When the engine reaches the optimal temperature, the thermostat opens to allow coolant to circulate and cool the engine down. If the thermostat gets stuck closed, the engine can overheat, potentially leading to costly repairs.
How to Tell If Your Car’s Thermostat Is Failing?
Knowing the signs of a faulty thermostat is crucial for catching issues before they become serious. Here are some warning signs that your car’s thermostat may need replacing:
- Engine Overheating: If your engine is overheating, it’s a clear indication that the thermostat might be stuck closed and not allowing coolant to flow through the engine.
- Coolant Leaks: A faulty thermostat may cause the coolant to leak from the housing or other components.
- No Heat from the Heater: If you notice that the heater in your car is blowing cold air, it could be a sign that the thermostat isn’t working properly.
How Long Does It Take to Replace a Car Thermostat?
Replacing a thermostat typically takes 1 to 2 hours, depending on the make and model of your car. Some vehicles have more accessible thermostats, while others may require removing other parts to get to it. If you’re an experienced DIYer, you may be able to complete the job quicker.
Cost of Replacing a Thermostat in Your Car
If you decide to replace your thermostat at a mechanic’s shop, the cost can vary widely based on labor rates and the type of car you own. On average, expect to pay anywhere from $150 to $300 for a thermostat replacement. If you choose to do it yourself, the cost of the part alone is typically between $20 and $60. The savings on labor make DIY repairs an attractive option for many car owners.
Essential Tools for Changing a Car Thermostat
Before you get started, make sure you have the following tools and supplies:
- New Thermostat (the correct model for your vehicle)
- Socket Wrench Set
- Screwdrivers
- Coolant (to refill your system)
- Drain Pan (to catch coolant runoff)
- Safety Glasses and Gloves
- Gasket Scraper (if necessary for cleaning)
Step-by-Step Guide to Replacing a Thermostat in Your Car
Now that you know the basics, let’s get into the step-by-step process for replacing your car’s thermostat.
Step 1: Prepare Your Car
Start by parking your car on a flat surface. Turn off the engine and allow it to cool completely. Working on a hot engine can cause burns or injuries. Once the engine is cool, disconnect the negative terminal of the car battery to prevent any electrical accidents.
Step 2: Drain the Coolant
Place a drain pan underneath your car’s radiator to catch the coolant as you remove it. Open the radiator cap and use the drain valve (usually located at the bottom of the radiator) to drain the coolant into the pan. If your car doesn’t have a drain valve, you can remove the lower radiator hose to let the coolant drain out.
Step 3: Locate the Thermostat
The thermostat is typically located where the upper radiator hose meets the engine block. It is housed in a metal or plastic housing. Depending on your car, you may need to remove additional components such as the air intake or hoses to access the thermostat.
Step 4: Remove the Thermostat Housing
Once you have located the thermostat, use your socket wrench to remove the bolts securing the thermostat housing. Be careful when removing the housing as some coolant may still spill out.
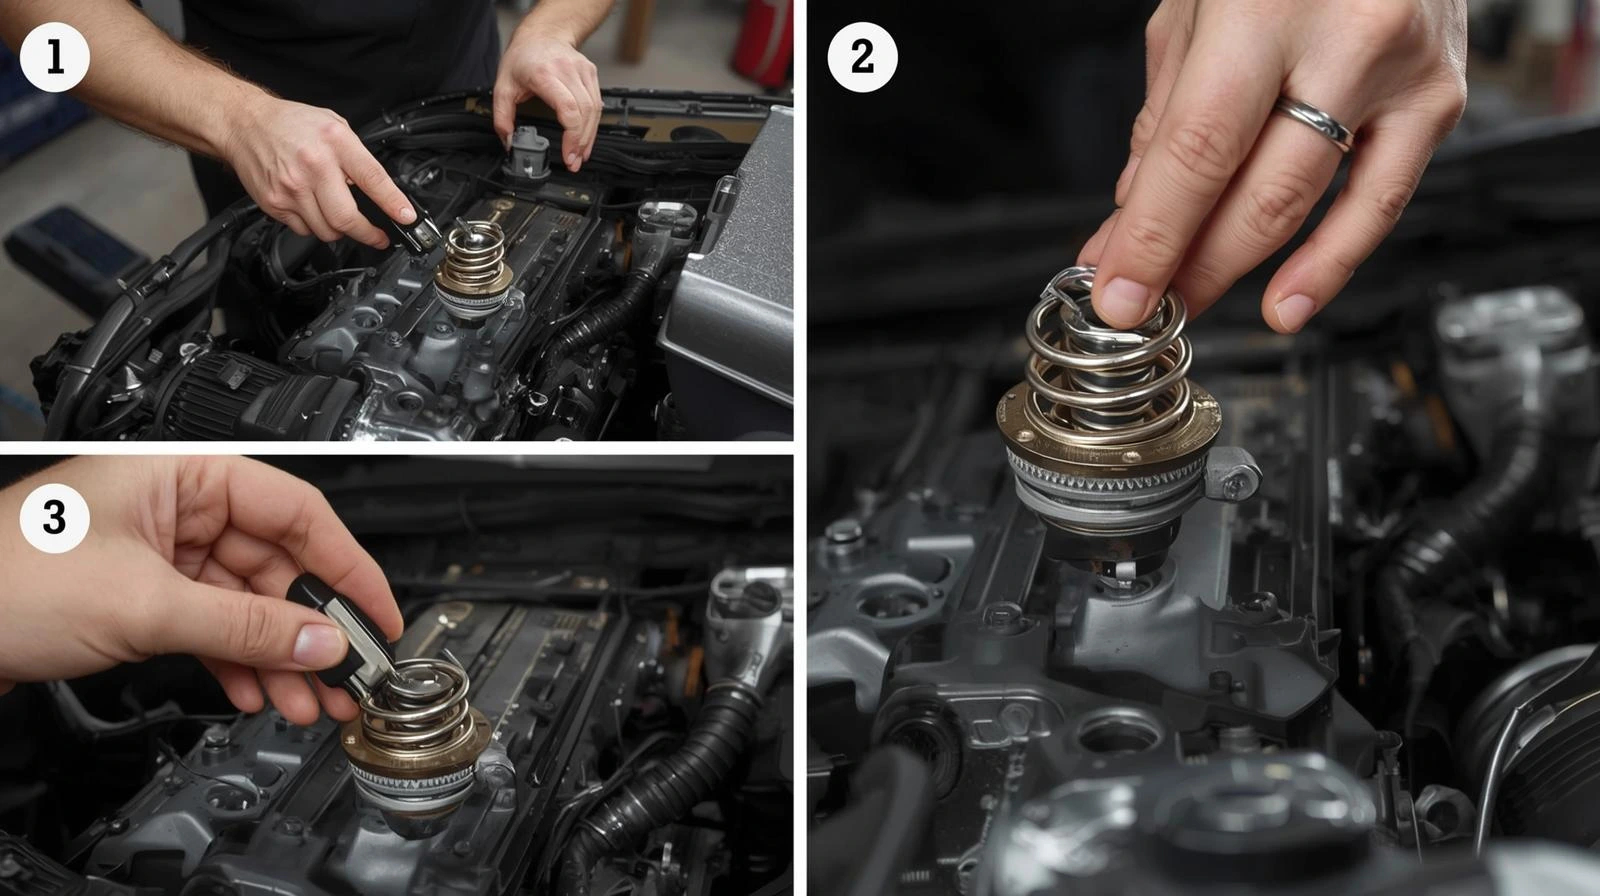
Step 5: Take Out the Old Thermostat
After removing the housing, you should be able to pull the old thermostat out. Pay close attention to how it is positioned so that you can install the new one in the same way.
Step 6: Clean the Housing and Gasket Area
Use a gasket scraper or a clean rag to remove any old gasket material and debris from the housing and engine surface. A clean mating surface ensures a good seal when you install the new thermostat.
Step 7: Install the New Thermostat
Place the new thermostat in the housing in the exact position as the old one. If your car uses a gasket, replace it or apply a small amount of sealant to ensure no leaks. Make sure everything is aligned correctly.
Step 8: Reassemble the Parts
Reattach the thermostat housing and secure it with the bolts. Tighten them evenly but not excessively tight, as over-tightening can crack the housing. Reattach any hoses or components you had to remove earlier.
Step 9: Refill the Coolant
Now that everything is reassembled, refill the coolant reservoir with fresh coolant, making sure to use the type specified in your owner’s manual. Check for any signs of leaks around the thermostat housing and tighten bolts if necessary.
Step 10: Test the System
Reconnect the battery, start your car, and allow it to idle. Keep an eye on the temperature gauge to ensure the engine reaches the proper operating temperature. If the gauge stays steady and doesn’t overheat, you’ve done the job correctly.
Step 11: Dispose of Old Coolant Properly
Coolant is toxic to the environment, so it’s important to dispose of it properly. Take the used coolant to a recycling center or an auto parts store that accepts it for disposal.
Tips for Changing Your Car’s Thermostate
- Refer to your car’s manual: Always check the specific steps for your car’s make and model. Some cars have unique cooling systems or thermostat designs.
- Use the right coolant: Different cars use different types of coolant. Always make sure you are using the right type for your engine.
- Monitor engine temperature: After replacing the thermostat, always monitor your car’s temperature gauge to ensure everything is working properly.
FAQs
1. How Do I Know if my Thermostat Is Bad?
A malfunctioning thermostat often causes the engine to overheat or, in some cases, the heater to blow cold air. You might also notice coolant leaks around the thermostat housing.
2. Can I Drive with a Broken Thermostat?
It’s not recommended to drive with a broken thermostat, as it can lead to overheating and severe engine damage. It’s best to replace it as soon as possible.
3. How Much Does It Cost to Replace a Car Thermostat?
Replacing a thermostat can cost anywhere from $150 to $300 at a shop, including labor and parts. If you do it yourself, the part itself costs between $20 and $60.
4. What Happens If I Install the Thermostat Backwards?
If you install the thermostat backwards, it may not open correctly, causing the engine to overheat. Be sure to install it according to the manufacturer’s specifications.
Conclusion
Replacing the thermostat in your car is a manageable task with the right tools and some careful attention. Whether you’re doing it for the first time or you’re a seasoned DIYer, this guide will help you through the entire process. Regular maintenance like changing a thermostat can prevent serious engine damage and keep your car running smoothly. Always remember to work safely, and don’t hesitate to consult a professional mechanic if you’re unsure at any point during the repair process.