
Changing your car’s coolant is a critical part of vehicle maintenance. Coolant helps to regulate your engine’s temperature and prevents it from overheating, which can lead to severe engine damage. If you’ve noticed your engine temperature rising or you’re simply overdue for a coolant change, this guide will walk you through how to change your car’s coolant in easy-to-understand steps.
By learning how to perform this task yourself, you can save money on repairs and ensure your car runs smoothly for years to come.
What is Coolant and Why is it Important?
Coolant (also known as antifreeze) is a fluid that circulates through your engine to keep it at an optimal temperature. When your engine heats up, the coolant absorbs the excess heat and transfers it to the radiator where it’s cooled down. In winter, coolant also helps prevent the engine from freezing.
Over time, coolant can degrade, collect contaminants, or lose its ability to resist extreme temperatures. That’s why regular coolant changes are necessary to keep your engine running smoothly.
How Often Should You Change Your Coolant?
The frequency of changing your coolant depends on your car’s make and model, but as a general rule, most cars should have their coolant changed every 30,000 to 50,000 miles (or every 2-4 years). Always check your vehicle’s owner’s manual for the manufacturer’s recommended intervals.
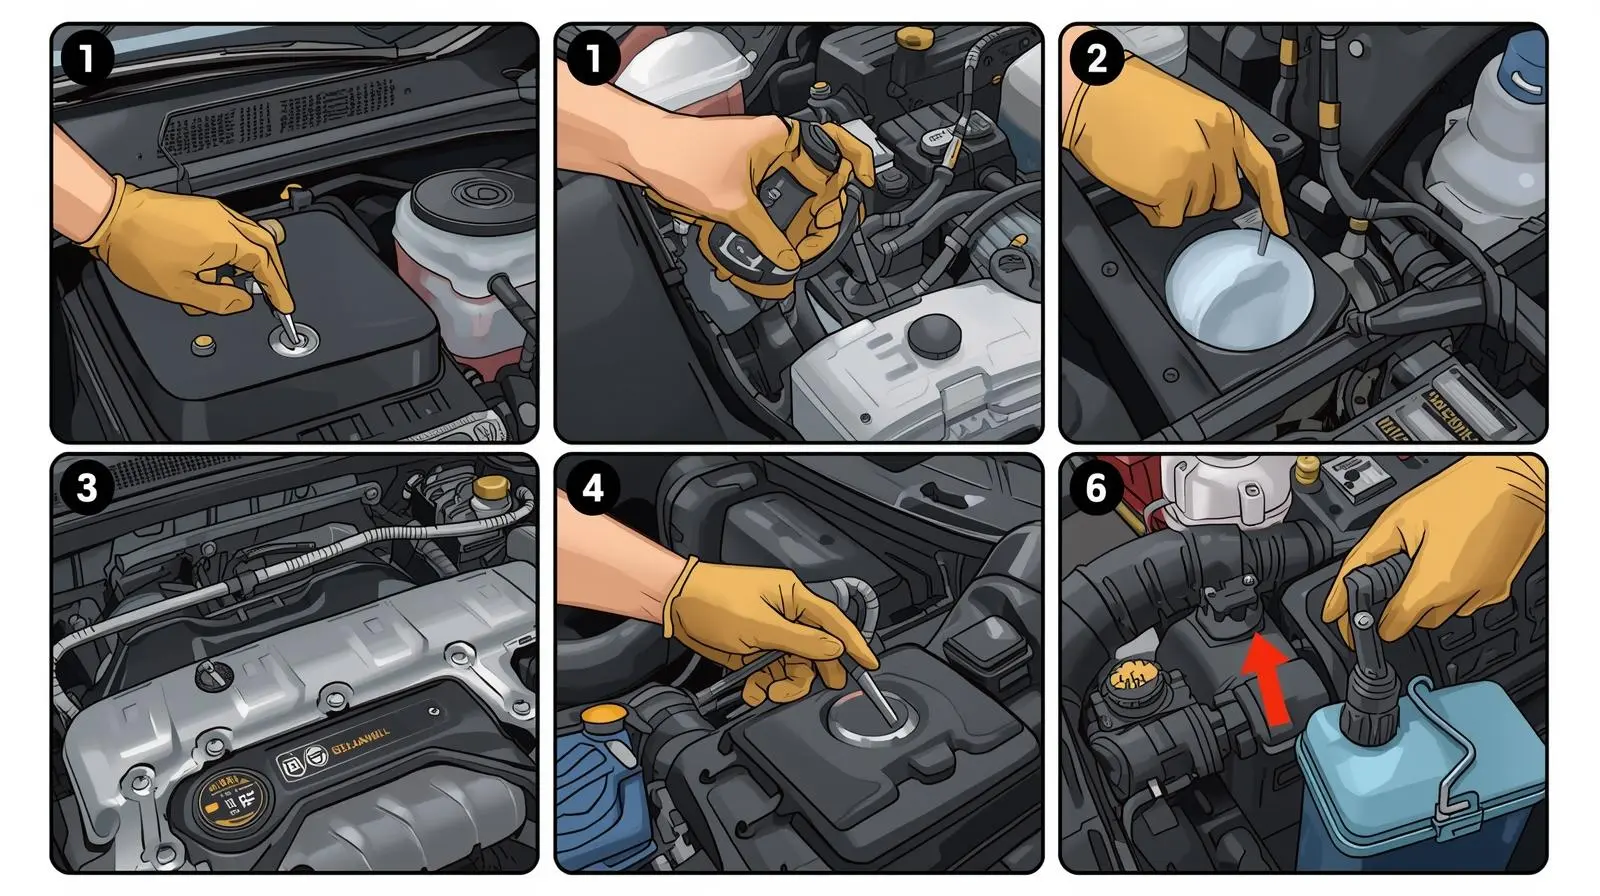
Step-by-Step Guide: How to Change Your Car Coolant
Changing your coolant is a manageable DIY task that doesn’t require professional experience. Just follow these simple steps:
Tools You’ll Need:
- New coolant (check your manual for the right type)
- A drain pan
- A funnel
- Pliers or a socket wrench (for the radiator plug)
- Gloves (to keep your hands safe)
- A rag or towel (for cleanup)
- A cooling system flush solution (optional but recommended)
Step 1: Prepare Your Vehicle
Before you begin, make sure the engine is completely cool. Coolant can be extremely hot and dangerous if you open the radiator while the engine is warm. Give your vehicle time to cool down, preferably a few hours or overnight.
Once the engine is cool, park your car on a flat surface and engage the parking brake.
Step 2: Locate the Radiator Drain Plug
The radiator drain plug is located at the bottom of your radiator. This small valve is where you’ll release the old coolant. You can find the exact location in your car’s owner’s manual if you’re unsure.
Step 3: Drain the Old Coolant
Place your drain pan under the radiator, and then carefully open the drain plug using your pliers or socket wrench. Be cautious as coolant may spill out quickly. Let it drain fully into the pan.
It might take a few minutes, so be patient. After draining, make sure to tighten the drain plug back into place.
Step 4: Flush the Cooling System (Optional)
If your coolant is dirty or hasn’t been changed in a while, it’s a good idea to flush the radiator. Use a radiator flush product, which you can buy at most auto stores.
Follow the instructions on the flush product, and then run your car for the recommended amount of time. Afterward, repeat Step 3 to drain the flushing solution.
Step 5: Refill the Radiator with New Coolant
Now it’s time to add the new coolant. Use a funnel to carefully pour the new coolant into the radiator. Be sure to check your owner’s manual for the correct type of coolant for your car.
Most cars require a 50/50 mixture of coolant and water, but some coolants are pre-mixed. Read the label on the coolant bottle to be sure.
Step 6: Bleed the Cooling System (If Needed)
Some vehicles require you to “bleed” the cooling system to remove any trapped air. If your car needs this step, it will usually involve running the engine with the radiator cap off until the coolant level stabilizes. Follow your owner’s manual for instructions specific to your car.
Step 7: Check for Leaks
After filling the radiator, check for any leaks around the radiator cap, drain plug, or hoses. If you spot any leaks, you may need to tighten the components or replace faulty parts.
Step 8: Dispose of the Old Coolant
Never dispose of used coolant by pouring it down the drain or throwing it in the trash, as it’s harmful to the environment. Take it to a local recycling center or auto parts store where it can be safely disposed of.
FAQs
1. How do I know when to change my coolant?
The general recommendation is every 30,000 to 50,000 miles, or every 2-4 years. However, if you notice your engine overheating, the coolant looks dirty or discolored, or the temperature gauge is higher than usual, it might be time to change the coolant sooner.
2. Can I mix different types of coolant?
It’s not recommended to mix different types of coolant. Some coolants are based on different chemical formulas, and mixing them can cause chemical reactions that reduce their effectiveness. Always use the type of coolant specified in your vehicle’s manual.
3. Can I drive my car without coolant?
No. Driving without coolant can cause your engine to overheat, which can lead to severe and expensive damage. Always ensure your coolant levels are adequate before driving.
4. Should I change the coolant myself or hire a mechanic?
Changing your coolant is a simple task that many people can do themselves, especially with a clear guide like this one. However, if you don’t feel comfortable doing it, it’s always best to hire a professional mechanic to handle the job.
Conclusion:
Changing your car’s coolant regularly is an essential part of maintaining your vehicle’s engine. By following the simple steps outlined in this guide, you can easily change your coolant at home and keep your engine running smoothly. Always check your car’s owner’s manual for the right coolant and replacement schedule, and don’t forget to dispose of old coolant responsible.